
How To Splice Wire Rope Using Multiple Compression Sleeves
Spacing Is Important When Using Multiple Sleeves
Eye splices normally require one sleeve for a full-strength solution. However, in some custom applications, eye splices and lap splices are fabricated with more than one compression sleeve to achieve greater grip and/or to add redundancy in a safety-critical application. Nicopress is often asked about the proper positioning and press sequences when multiple oval sleeves are required for a termination.
This question arises for eye splice terminations and more often for lap joint sleeve connections. This subject can be confusing, since some literature suggests not using more than one sleeve in a termination because one sleeve may fail first, producing a “domino” effect on the remaining sleeves. While this is possible, it can occur only if all three of the following conditions are true:
- A special application rope splice requires more than one sleeve to meet the tension requirement. In other words, one sleeve will not provide enough grip strength for the custom application, so two sleeves must be used; and,
- The two sleeves have been spaced too far apart from each other (significantly more than two rope diameters’ distance); and,
- If after swaging both sleeves, one of the two intermediate ropes (i.e., ropes between the sleeves) is longer than the other.
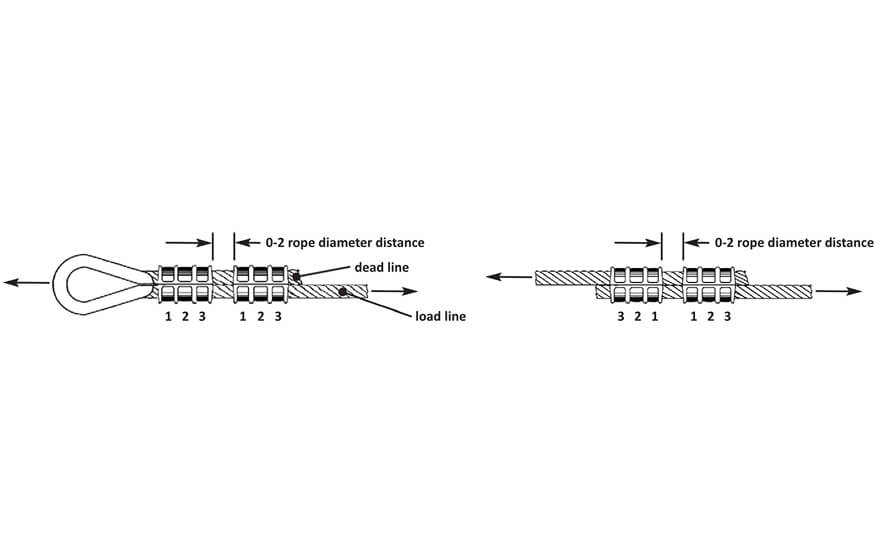
We have found that when the gap between any two sleeves is no more than 0 to 2 diameters, the intermediate ropes cannot differ in length enough to cause unequal sharing of rope tension, thus eliminating premature failure of one of the sleeves at the termination. The intermediate ropes will share the load equally if they are the same length between sleeves. If the “dead line” is longer, the sleeve nearest the eye will fail first; if the “load line” is longer, the sleeve with the rope end will fail first. See below for additional theory on double-sleeve terminations resulting from Nicopress testing.
Recommended: Eye splice and lap splice with correct sleeve spacing between sleeves & press sequence
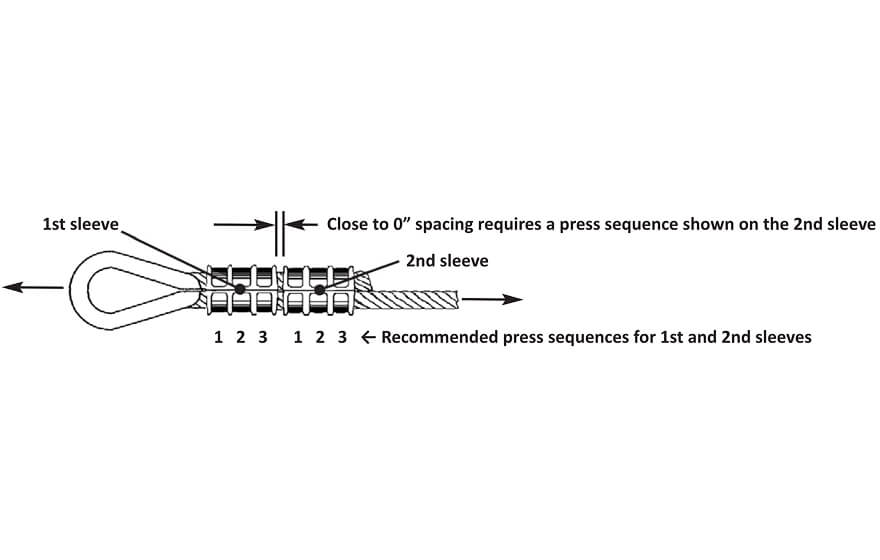
If it is desired to install the second sleeve in contact with the first, the second sleeve must be pressed in the sequence as shown below so that the sleeve material flows outward, away from the interface during swaging. For an eye splice with two sleeves and near 0" spacing, follow this pressing sequence:
NOT Recommended: Excessive sleeve spacing that allows one intermediate rope to differ in length
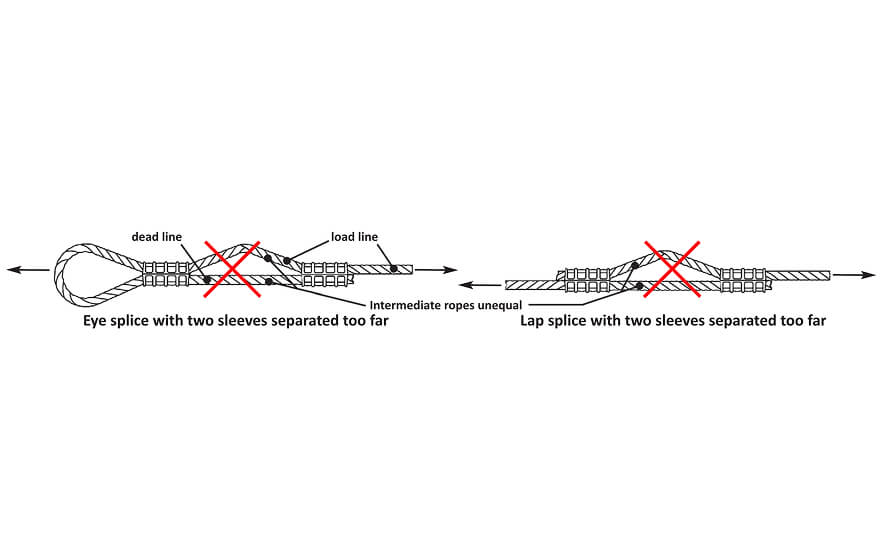
When multiple sleeves are necessary for special eye splices or lap splices, it is always better to keep the sleeves as close as possible to prevent one intermediate rope from becoming longer than the other. If the above Nicopress instructions for multiple-sleeve installations are used, the terminations will act additively and perform reliably and consistently.
Theory
Force analyses when intermediate ropes are of equal lengths
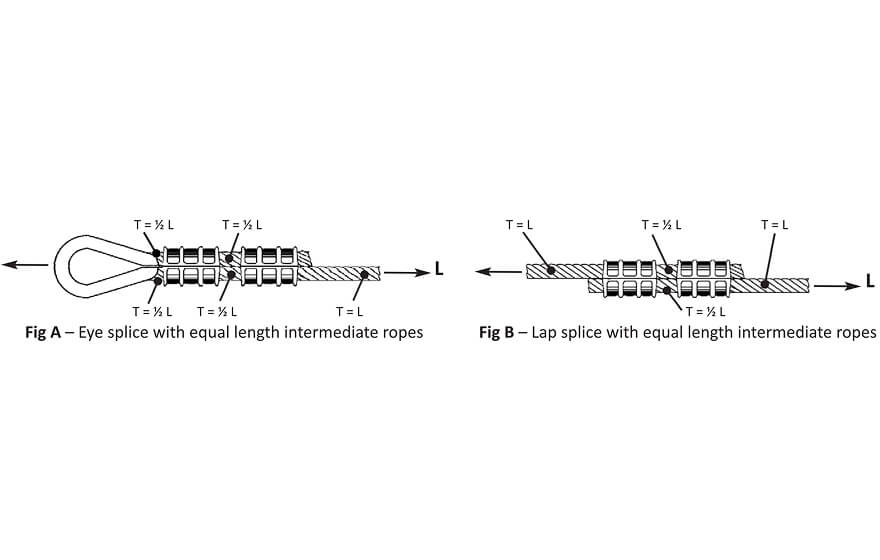
In Figures A and B, “T” is the line tension and “L” the line load (force) applied to the termination. The intermediate ropes share the load equally, with each rope tension equal to approximately half of the load. This is unlike an unequal intermediate rope pair, which shifts the entire load to the shortest length intermediate rope, thus causing a single sleeve to handle the full load rather than both sleeves.
Force analyses when initially loaded and intermediate ropes are of unequal lengths
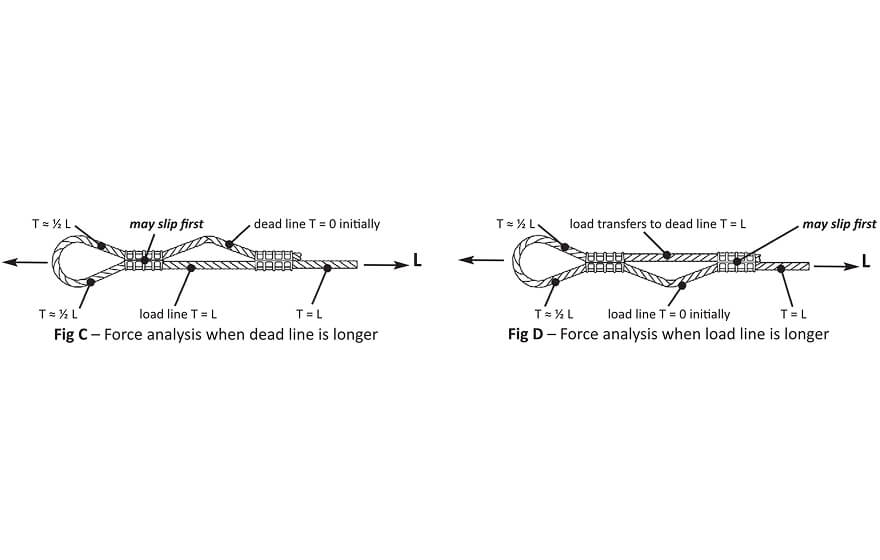
When an application requires two sleeves to achieve a full- strength termination and the intermediate ropes are unequal, then:
- If the dead line is longer, the sleeve nearest the eye (or “eye splice sleeve”) will fail first.
- If the load line is longer, the sleeve with the rope end (or “end sleeve”) will fail first.
Fig C – The dead line is longer, so the load “L” remains the same on the intermediate loadline rope, which transfers the entire load to the single eye splice sleeve. As the load increases, the eye splice sleeve cannot support the full load and begins to slip.
This action will draw the end sleeve closer to the other sleeve, either holding the load or causing both sleeves to fail.
Fig D – Since the intermediate load line is longer, the load immediately transfers to the dead intermediate rope and then to the single eye splice sleeve. As the load increases, the eye splice sleeve holds stronger than the end sleeve, since the end sleeve acts like a single lap splice with the entire load on each rope entering and exiting it.
This causes the end sleeve to slip first, either with the rope end ejecting or the end sleeve drawn toward the eye sleeve. This action either will hold the load or cause both sleeves to fail.
Final Comments: If a rigger wishes to add redundancy to a termination by doubling sleeves (when only one sleeve is necessary for a full-strength connection), it is advised to follow the recommended procedure for close spacing. This is necessary since:
- If the Fig D configuration occurs, the load is transferred to the deadline, and the right sleeve will initially act as a single lap splice, which is not as strong as the left sleeve with an eye splice. This right sleeve would likely slip initially, and then the left sleeve eye splice would take the full load, since it is a full-strength connection. In this configuration, only one sleeve will operate at full strength, and the anticipated redundancy is lost.
- If the Fig C configuration occurs, the load transfers to the eye splice, which will hold, since it is a full-strength connection. However, the anticipated redundancy is still lost.
- Per Fig A, when the recommended close spacing is used, the two sleeves will act in series to double the grip capability, and either sleeve will act at full strength, achieving the anticipated redundancy.
Get Useful Information on Wire Rope Splices
Download a PDF of this wire rope slice guide, or contact our team to learn more about how to splice wire rope.