Eye splices with swaged sleeves are used for terminating wire rope. When you press an oval sleeve, the sequence matters as much as the force. You want each press to work with the next, not fight it. That means you never crush material back toward a spot you already pressed.
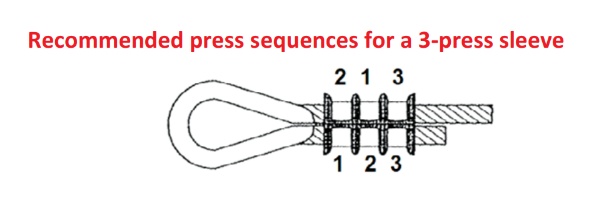
There are two acceptable ways to swage a 3-press sleeve:
Sequence 1-2-3: Start with the press closest to the loop, then move toward the dead end, following a simple forward pattern.
Sequence 2-1-3: Start with the middle press, then press the loop-side position, and finish at the dead end.

The same rule applies with a 4-press sleeve:
Sequence 1-2-3-4: Start at the loop end and work toward the dead end, pressing each cavity in order.
Sequence 2-1-3-4: Start one position in from the loop, then press the loop-side cavity, then finish the remaining two toward the dead end.
In both cases, you either work straight from the loop toward the protrusion or “tail,” or you start in the middle and then work outward. You never come back and form a press between two that are already complete. This keeps the metal flowing in one direction and helps prevent the internal wires from bending in ways that can compromise strength.
NOTE: Nicopress sleeves should only be used with Nicopress tools and “go” gauges.
There are also patterns you should avoid. Many installers are tempted to put a press in between two earlier presses. When that happens, the last press pushes material back into the first two. Inside the sleeve, that extra squeeze can strain or even break wires.

Leave a Tail Outside the Sleeve
When you build an eye splice, start with a tail that will still show after you make the final press. Aim for roughly one to two rope diameters of wire sticking out past the sleeve.
Here is why that matters: As the sleeve compresses, it lengthens, and the rope can pull deeper into the sleeve while this happens. If the tail disappears inside, the amount of rope the sleeve grips will become much harder to predict, and holding power can be reduced as well.
Keep the Sleeve Off the Thimble
You also need a small gap between the sleeve and the thimble. A good target is about half of the rope diameter.
During pressing, the sleeve grows in length. Without that clearance, the metal can run into the thimble on the last press, and that contact can pinch or scrape the outer wires. Over time, the damage it causes can shorten the life of the assembly and reduce splice strength.
A Simple Habit Protects Every Splice
These steps do not call for new tools or hardware, they only ask for careful habits at the bench. Follow a clear press order. Leave a tail that does not vanish. Hold the sleeve back from the thimble so it has room to grow.
Keep these steps in mind, so every operator can check it before they press.